
5-Step Liese Bubble Hair Color Tutorial + Review
Going
back to being an advertising student, my classmates in 2nd year college were so
creative back then when it comes to DIY-ing their hair color. I didn't have the guts of doing
the same thing because I find the coloring process tedious plus I'm afraid that
I might cause further damage to my hair. Throughout these years, I've relied on
hair salons in terms of taking care of my hair - whether for hair treatments or
hair dyeing.
But now, I finally gave in the temptation as I do my first ever DIY hair color tutorial. Yay! Read below as I give a step-by-step process on how I colored my hair using Liese Creamy Bubble Color!

Above is my previous hair color (unfiltered) taken under direct sunlight. Welp, bloggers always trust the natural light when it comes to selfie / candid photos. (I know everyone will agree. hihi)
The Product
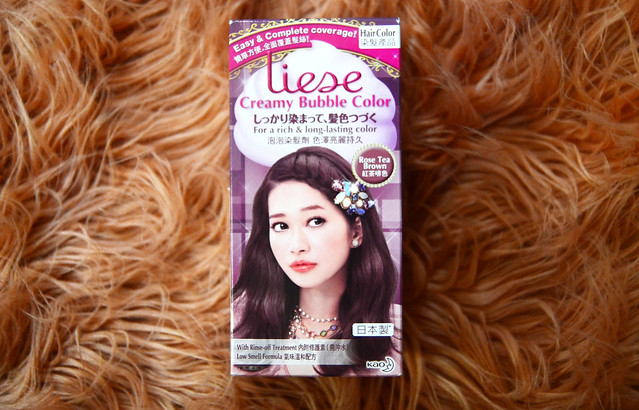
For background information, Liese Creamy Bubble Color is Japan's #1 Hair Coloring Brand. The product contains Royal Jelly (moisturizing ingredient) and Hydrolized Silk (hair protecting ingredient) which promises a smooth to finger-comb, with moisturized finish.
Liese Creamy Bubble Color is available in leading retail stores and can also be bought at Beauty MNL for Php 449 / box.
For this tutorial, I am using the Rose Tea Brown color for my hair.
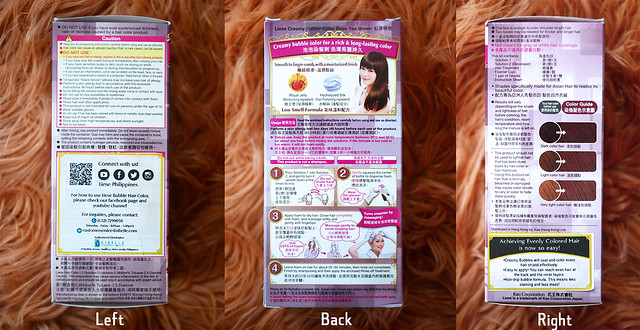
The box contains information that serves as a guide before trying out the product. The back of the box contains the step-by-step process on how to use it while the right side contains the hair color guide for different hair shades.
Obviously, the base color of your hair will dictate how dark or light the outcome of the color will be. As for me, the roots of my hair have shown already that's why I'm expecting an uneven hair color distribution as soon as I finish this tutorial.
Inside the box are the following:

Preparation
Reminders! First, change to a clothing that you're willing to get stained from the hair color if ever you don't have a salon cape at home. To avoid staining your skin, apply an oil-based skin cream on your forehead, ears and arms. Petroleum jelly will suffice. Also, make sure to comb your hair thoroughly prior hair color application to avoid tangles.
Hair Color Time
Made everything simpler by showing the steps through GIFs. Just follow it and you'll do good. :)
Happy DIY hair coloring!
Press in the middle of the
bottle and dispense foam onto gloved hand. Make sure to not tilt the container
too much when dispensing.
Color result will not turn
out brighter if the amount used is insufficient. The standard is, for shoulder
length hair, you must consume the foam of the entire bottle.


Below is how my hair looks like in direct sunlight. The reddish color is of course more obvious. I was looking forward to a more lavender-finish but I guess my previous hair color affected the final result.

Begin by applying the foam on the parting and top of your head. Next, apply foam evenly throughout the length of your hair. Then, apply foam right up to the roots at the back by parting the hair apart. Also, apply generously right up to the ends of your hair.
As I massage the foam on my hair, I observed that the smell wasn't as strong as I thought. On my other hair coloring sessions before, I usually place a face mask because of the strong smell that the formula has.
Also, my scalp felt minimal stinging effect as I massage the foam to my roots. In case you have a wound on your scalp, coloring your hair is a big no-no!
Anyway, for those with long hair like me, run your fingers upwards through your hair as you gather them at the top of your head for more even color distribution.
Lastly, use your fingertips to massage lather on hair so that the foam reaches all the way to the roots. Make sure to check for hair tangles while massaging your hair. Plus, don't forget to wipe off the foam if it gets into your face, hairline, ears, neckline or arms.
Leave it on for around 20-30 minutes!

If
the lather begins to run during the waiting time, massage hair again.
Finishing Touches
After the waiting time, rinse your hair with your trusted shampoo and conditioner. Like what I've said awhile ago, my roots have grown already that's why I already expected the uneven color distribution. But you can tell that my hair became darker and reddish compared to my previously blonde brown hair color.

Unedited Before and After
Photos
The Verdict
Below is how my hair looks like in direct sunlight. The reddish color is of course more obvious. I was looking forward to a more lavender-finish but I guess my previous hair color affected the final result.

Pros:
*Easy to use
*Value for Money
*Low smell formula
*Availability
*Beautiful, instant results
Cons:
*It's tiring for the arms. hihi
My arms got tired most probably because I did the process on my own. You can ask for a helping hand if you feel like you can't stand massaging your hair for quite some time.
As an ending note, if I need a quick hair fix for an event, I'll definitely use Liese Creamy Bubble Color again! It's easy and quick to use plus results can be seen in an instant.
Check out Liese Philippines on Facebook at facebook.com/LiesePHL to know more about their product availability and etc.


0 comments
What do you think? Share your thoughts below!